HashiCorp Vault Spring Boot Example

In this section, we will explore the integration of HashiCorp Vault with a Spring Boot application and the utilisation of HashiCorp Vault for secure secret storage in a Spring Boot environment. When operating in a production setting, it is crucial to establish a secure storage mechanism for essential application components such as database credentials, passwords, API keys, and other sensitive data. Dive into this HashiCorp Vault Spring Boot example to ensure robust security.
HashiCorp Vault presents a solution that allows us to fortify our applications and safeguard sensitive information, thereby minimizing the potential risks associated with data breaches and exposure. This is achieved through identity-based security automation and encryption-as-a-service capabilities.
Access the source code of HashiCorp Vault Spring Boot Example project in github repository.
Table of Contents:
- Installing HashiCorp
- HashiCorp Vault Server
- Create a secret using HashiCorp Vault
- Integration with Spring Boot Application
1. Installing HashiCorp:
You have three options to install HashiCorp Vault on your machine
- Docker Image
- Manual Installation
- Installer for various operation systems like MacOs, windows and linux
As I am using mac machine, lets install HashiCorp vault with brew command as follows
brew tap hashicorp/tapbrew install hashicorp/tap/vaultTo verify the installing type the below command in the command line tool which will output list of valid cli commands to be used with vault keyword.
vault2. HashiCorp Vault Server:
After installation run the below command to start the HashiCorp vault server in dev profile.
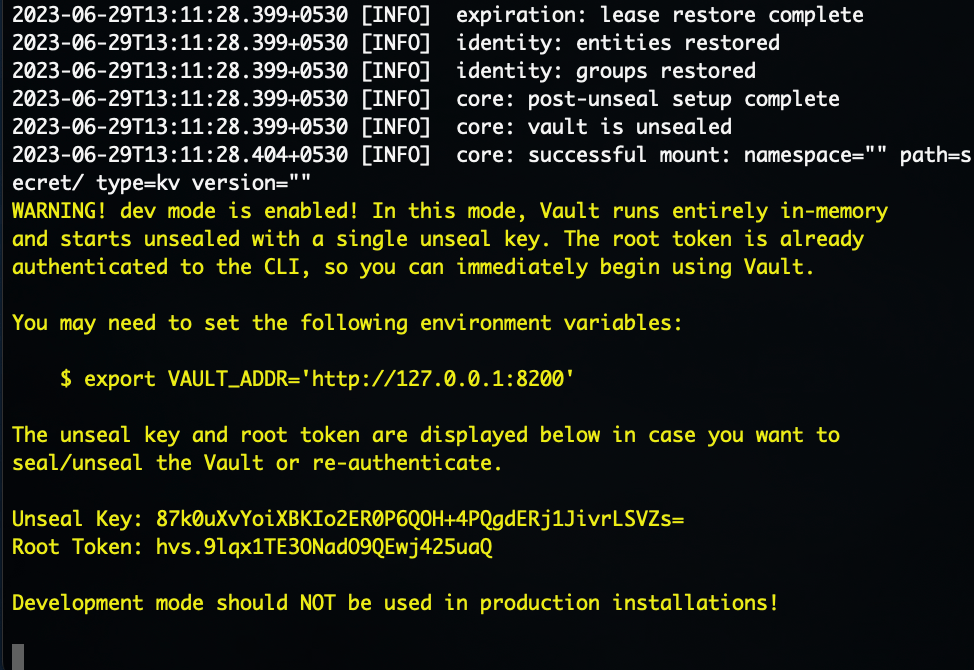
vault server -devIf server started without any issues, vault server prints the below logs. Note down unseal key and root token for future reference. Root token is used to login web ui in step 3.

3. Create a secret using HashiCorp Vault:
HashiCorp provides webUI to create and manage the secrets. To access the web ui http://localhost:8200 in the browser address which opens the login page of vault web ui. HashiCorp runs in 8200 port by default.

HashiCorp provides multiple login access methods, for this example we will use token based approach. From step 2, input the root token and click sign in button.
To create secrets click on the secret from secret engine list as shown in below reference

Click on the Create Secret button and enter the following details on the next page
In “Path for this secret” textfield enter “hashicorp-vault-spring-boot-example”.
- vault.secret1 = <<Input secret code>>
- vault.secret2 = <<Input secret code>>
After that click on save button. Now we had successfully created the secret.
4. Integration with Spring Boot Application:
In this section lets us create a simple boot application and integrate it with HashiCorp Vault. Create Spring Boot application using Spring initializr. Use Gradle or Maven as project build management tool. Select Spring Boot version, in this example I am selecting Spring Boot Version 3.1.1. Enter the project metadata like Group, Artifact, Name, Description, Package Name. Select Package format jar or war file. In this example I am choosing Java 17 version.

In the dependencies section, choose Spring Web and Vault Configuration package and click generate button.
pom.xml
<?xml version="1.0" encoding="UTF-8"?>
<project xmlns="http://maven.apache.org/POM/4.0.0" xmlns:xsi="http://www.w3.org/2001/XMLSchema-instance"
	xsi:schemaLocation="http://maven.apache.org/POM/4.0.0 https://maven.apache.org/xsd/maven-4.0.0.xsd">
	<modelVersion>4.0.0</modelVersion>
	<parent>
		<groupId>org.springframework.boot</groupId>
		<artifactId>spring-boot-starter-parent</artifactId>
		<version>3.1.1</version>
		<relativePath/> <!-- lookup parent from repository -->
	</parent>
	<groupId>com.example</groupId>
	<artifactId>demo</artifactId>
	<version>0.0.1-SNAPSHOT</version>
	<name>demo</name>
	<description>Demo project for Spring Boot</description>
	<properties>
		<java.version>17</java.version>
		<spring-cloud.version>2022.0.3</spring-cloud.version>
	</properties>
	<dependencies>
		<dependency>
			<groupId>org.springframework.boot</groupId>
			<artifactId>spring-boot-starter-web</artifactId>
		</dependency>
		<dependency>
			<groupId>org.springframework.cloud</groupId>
			<artifactId>spring-cloud-starter-vault-config</artifactId>
		</dependency>

		<dependency>
			<groupId>org.springframework.boot</groupId>
			<artifactId>spring-boot-starter-test</artifactId>
			<scope>test</scope>
		</dependency>
	</dependencies>
	<dependencyManagement>
		<dependencies>
			<dependency>
				<groupId>org.springframework.cloud</groupId>
				<artifactId>spring-cloud-dependencies</artifactId>
				<version>${spring-cloud.version}</version>
				<type>pom</type>
				<scope>import</scope>
			</dependency>
		</dependencies>
	</dependencyManagement>

	<build>
		<plugins>
			<plugin>
				<groupId>org.springframework.boot</groupId>
				<artifactId>spring-boot-maven-plugin</artifactId>
			</plugin>
		</plugins>
	</build>

</project>
VaultController.java
Create a VaultController.java file inside com.example.demo package and add the below code.
package com.example.demo;

import org.springframework.beans.factory.annotation.Value;
import org.springframework.web.bind.annotation.GetMapping;
import org.springframework.web.bind.annotation.RestController;

import java.util.HashMap;
import java.util.Map;

@RestController
public class VaultController {

    @Value("${vault.secret1}")
    String secret1;

    @Value("${vault.secret2}")
    String secret2;

    @GetMapping("/secret")
    public Map<String,String> getSecret()
    {
        Map<String,String> map = new HashMap<>();
        map.put("key1",secret1);
        map.put("key2",secret2);

        return map;
    }
}
application.properties
Let us include the HashiCorp Vault configurations in the application.properties file.
spring.application.name=hashicorp-vault-spring-boot-example
spring.cloud.vault.token=hvs.9lqx1TE3ONadO9QEwj425uaQ
spring.cloud.vault.uri=http://localhost:8200
spring.config.import: vault://
Run the Spring Boot Application using Maven
From command line cd to project root folder and enter the following commands to build and run the spring boot application using maven
mvn clean install
mvn spring-boot:run
API Testing:
Test the hashicorp vault spring boot example application using the below curl.
curl 'http://localhost:8080/secret' \
--header 'Content-Type: application/json' \
--data '{
    "key1": "qwedrf",
    "key2": "34bjk3"
}'
Next we will explore various use case of HashiCorp Vault with Spring boot. Thanks.


